Some of y’all may recall this post in which I repurposed an old book. Well, I decided to take book folding a bit further. I did some research on Pinterest as well as other craft sites, but unfortunately the tutorials ranged from vague to non-existent. The utter lack of an in-depth tutorial spurred me to create one. I’m not saying there aren’t other tutorials just as easy. I’m sure there are plenty. I just didn’t find many. No matter! One can never have too many tutorials on a subject, right?

What you’ll need:
- old paperback (with at last 96 physical pages)
- bone folder, or ruler
The first thing you will do is count the pages to make sure you have between 96 and 100 physical pages. Also, you must have an even number of pages. Next, you will start to fold the pages in sets of two.

You can fold a page at a time for a “fluffy” look, but folding two at a time makes it easier to curl later without creasing. You’ll see what I mean in a bit. Now you will fold the pages in a “dog-ear” style, starting from the top, and tucking tight into the center with the bone folder.

Forgive the blurriness. But at least you were spared the sappy writing, so you have that going for you! The bone folder folds a sharp crease, and helps to tuck the pages into the center. Now you will fold the pages from the bottom, making a triangle.

You will keep folding pages in sets of two starting from the top of the page. It won’t take very long, but do make sure to tuck in the pages tightly. Otherwise the cone will be a bit lopsided. Once you are about halfway done folding pages, it’s time to tear out the front and back covers. I leave them on while I begin so as to give the first pages some stability, but after a while, you can rip them off.
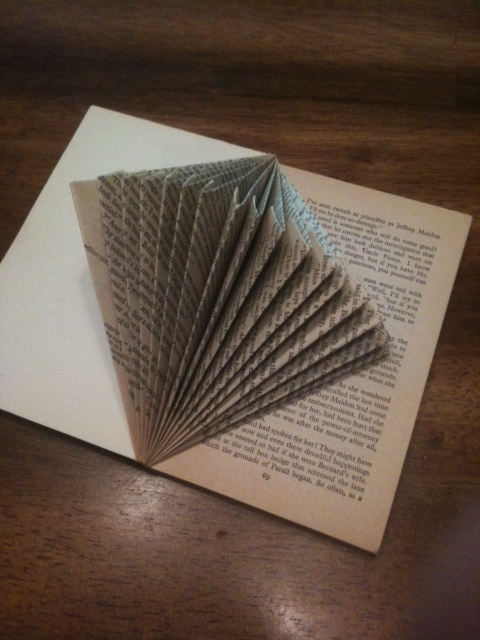
After you are done folding, you will have a cool little sculpture all on its own.

Now, you can stop here and leave it as is, or do another book and glue the endpages to each other to make an even “fluffier” stand-alone sculpture. Or you can run filament through the center and hang it. You can also continue to curl the pages inward in a pattern to get a different look.

Before you start, count the amount of triangles you have. Depending on the amount, you can either fold in sets of two or three, as long as you have an even number of sets. For example, if you have 48 triangles, you can fold in sets of three, because you’ll have 16 sets. If you have 44 triangles, you will fold in sets of two and have 22 sets. As long as you have an even number of sets, you are good to go. Now, turn the book upside down, so you can tuck the edges of the corners in. Take the first triangle at the end of the book, and curl it down and inward towards the center, tucking it in tightly with the bone folder. Do NOT fold the crease. Just leave it rounded, as above. Do this two or three times, depending on your triangle count. Then do the same to the next triangles, but starting from the bottom of the triangle and tucking upward and inward.

Continue the pattern until you reach the last triangles. Spread the tucked pages at the end and tuck the curls in. They will be a bit harder to tuck in, but once done the sculpture will not unravel. And you will be the proud owner of a masterpiece!

ISN’T IT AWESOME???
With that simple folding technique, you can make several different sculptures.

The best part about folding books is that you can always unfold and read them if you get curious. So although you do get to tear off the covers, at least you save the content. No matter how trite or sappy!!
Thanks for stopping by 🙂

Verrrah cool, ma’am!
Thank you 🙂 Better than tossing the book in the trash, right??